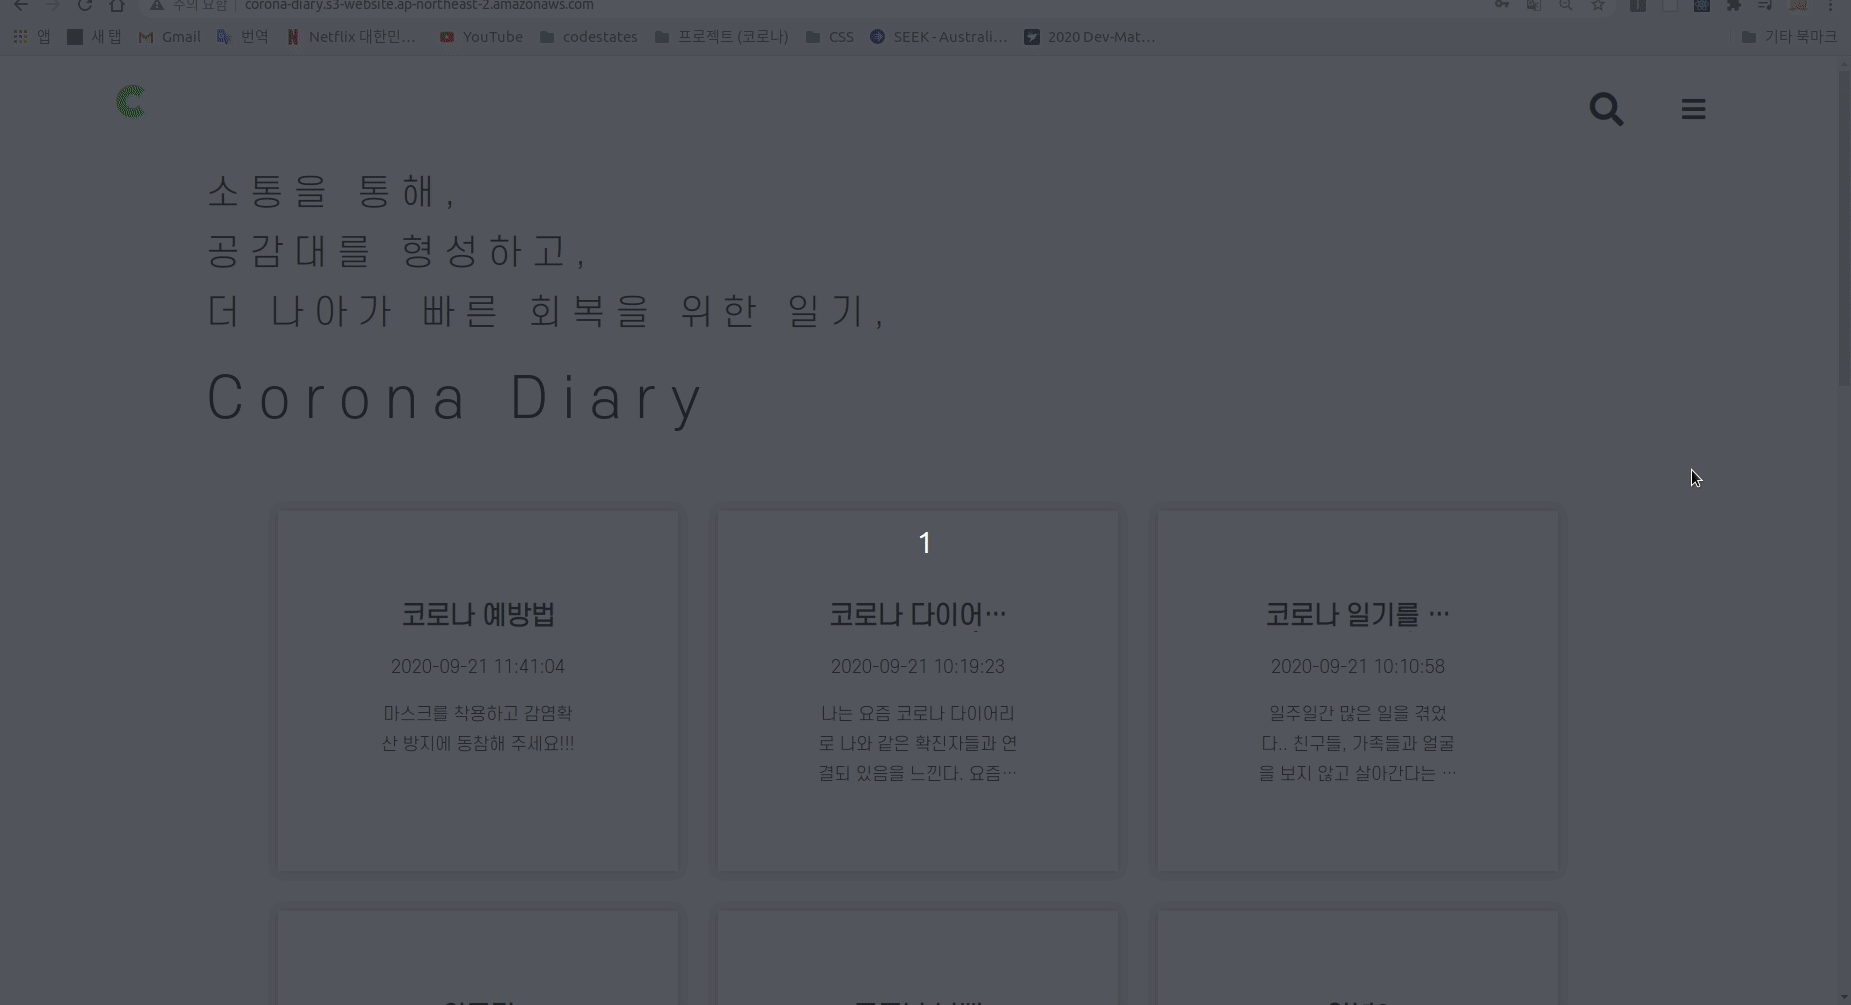
Project 명 : Corona-Diary
▶프로젝트 의도 : 소통을 통해, 공감대를 형성하고, 더 나아가 빠른 회복을 위한 일기

▶팀원: 4명
-front : 2명(내가 맡은 일 : react 기능 구현 및 CSS 담당)
-back: 2명
▶사용 Stack
- React, React-router, Axios, styled-component
▶구현영상
- 구현영상이 많아서 링크 참조 => Notion 바로가기
▶내가 한일
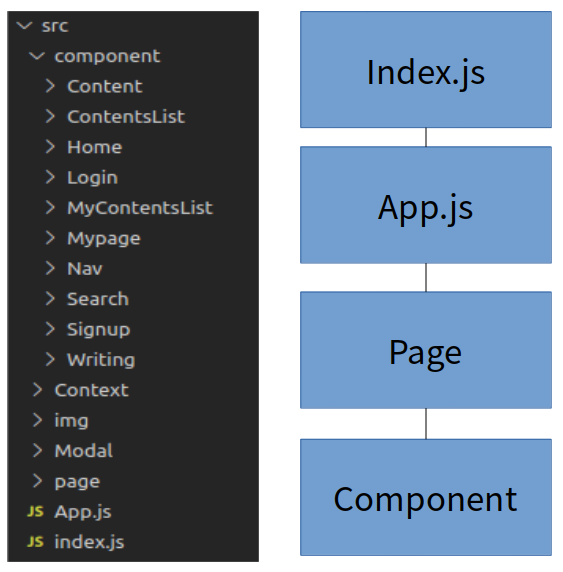
1. React - Router
- 코드 선정 : SPA형태를 모아서 Web 사이트를 만들려 했기 때문에 React-router로 router 해주기 위해 사용
- 코드 기능
* App.js에서 router를 통해서 page 폴더의 있는 page를 render를 하고 각 page의 기능들은 component폴더에 기능들을 넣어서 파일을 구성했다.
* Context 폴더는 useContext를 위해 따로 폴더를 만들어서 사용했다. useContext는 Redux에서 store 기능을 유사한 역할을 한다. 전체적으로 state 관리가 필요한 항목들을 넣었다.(Login 같은)
* Modal 폴더는 Modal창을 따로 구성해서 필요한 component에 불러와서 사용함.
1) Router 사용
2) useHistory 사용
3) useLocation 사용
- 코드 예시
import React from "react";
import { Switch, Route } from "react-router-dom";
import Home from "./page/Home";
import SignUp from "./page/SignUp";
import Content from "./page/Content";
import ContentsList from "./page/ContentsList";
import MyPage from "./page/MyPage";
import Login from "./page/Login";
import Writing from "./page/Writing";
import Search from "./page/Search";
import SettingInfo from "./page/SettingInfo";
import MyContentsList from "./page/MyContentsList";
import LoginProvider from "./Context/ContextProvider";
import SocialSignUpPage from "./page/SocialSignUp";

function App() {
  return (
    <div className="App">
      <LoginProvider>
        <Switch>
          <Route path="/" exact component={Home}></Route>
          <Route path="/user/signup" component={SignUp}></Route>
          <Route path="/content" component={Content}></Route>
          <Route path="/contentslist" component={ContentsList}></Route>
          <Route path="/mypage" component={MyPage}></Route>
          <Route path="/user/login" component={Login}></Route>
          <Route path="/writing" component={Writing}></Route>
          <Route path="/search" component={Search}></Route>
          <Route path="/settinginfo" component={SettingInfo}></Route>
          <Route path="/mycontentslist" component={MyContentsList}></Route>
          <Route path="/user/sociallogin" component={SocialSignUpPage}></Route>
        </Switch>
      </LoginProvider>
    </div>
  );
}

export default App;
- 코드리뷰 : Router는 2주 프로젝트에서 한것과 유사하게 Router를 해주었다.
*아래 Modal과 같이 설명
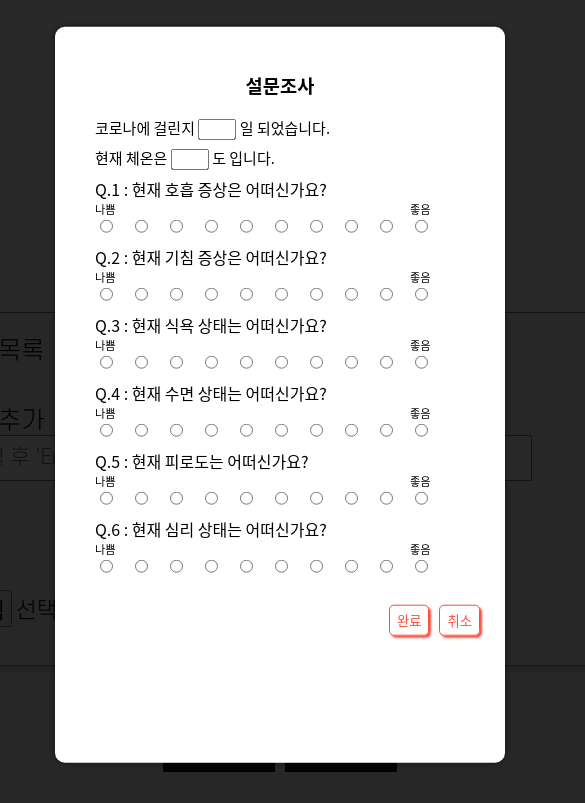
2. Modal창 구현
- 코드 선정 : window.alert 기능을 활용하려고 했으나, 알람창이 이쁘지 않아 직접 디자인해서 사용
- 코드 기능
1) Alert창
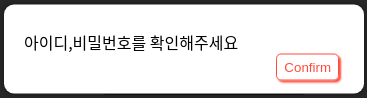
2) Prompt창
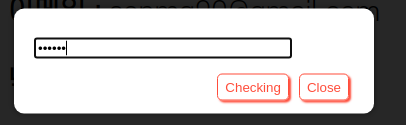
3) survey창
- 코드 예시
const AlertModal = ({
  children,
  visible,
  onClose,
  className,
  commentId,
  contentId,
}) => {
  const value = useContext(getLogin);
  let history = useHistory();
  let location = useLocation();

  const handleClose = () => {
    if (className === "complete") {
      onClose();
      history.go("/mypage");
    } else if (
      className === "login" ||
      className === "deleteCotent" ||
      className === "deleteCotentError" ||
      className === "content" ||
      className === "signout"
    ) {
      onClose();
      history.push("/");
    } else if (className === "logout") {
      onClose();
      if (location.pathname === "/") {
        history.go("/");
      } else {
        history.push("/");
      }
    } else if (className === "content") {
      onClose();
    } else if (className === "signup") {
      onClose();
      history.push("/user/login");
    } else if (className === "deleteComment") {
      onClose();
      history.go(`/comment/${commentId}`);
    } else if (className === "contentModify") {
      onClose();
      history.go(`/content/${contentId}`);
    } else if (className === "sociallogin") {
      onClose();
      history.push(`/`);
    } else if (className === "removeId") {
      onClose();
      history.push("/");
    } else {
      onClose();
    }
  };

  return (
    <Portal elementId={"modal-root"}>
      <ModalOverlay visible={visible} />
      <ModalWrapper tabIndex="-1" visible={visible}>
        <ModalInner tabIndex="0" className="modal-inner">
          {children}
          <div className="buttons">
            <button onClick={handleClose}>Confirm</button>
          </div>
        </ModalInner>
      </ModalWrapper>
    </Portal>
  );
};

export default AlertModal;

const ModalOverlay = styled.div`
  box-sizing: border-box;
  display: ${props => (props.visible ? "block" : "none")};
  position: fixed;
  top: 0;
  left: 0;
  bottom: 0;
  right: 0;
  background: rgba(0, 0, 0, 0.6);
  z-index: 999;
`;
const ModalWrapper = styled.div`
  box-sizing: border-box;
  display: ${props => (props.visible ? "block" : "none")};
  position: fixed;
  top: 0;
  left: 0;
  bottom: 0;
  right: 0;
  background: rgba(0, 0, 0, 0.6);
  z-index: 1000;
  overflow: auto;
  outline: 0;
`;
const ModalInner = styled.div`
  box-sizing: border-box;
  position: relative;
  box-shadow: 0 0 6px 0 rgba(0, 0, 0, 0.5);
  background-color: #fff;
  border-radius: 10px;
  width: 360px;
  max-width: 480px;
  top: 40%;
  transform: translateY(-50%);
  margin: 0 auto;
  padding: 0px 20px;
  padding-top: 25px;
  padding-bottom: 40px;

  button {
    float: right;
    margin-right: 5px;
    margin-left: 5px;
    color: tomato;
    background-color: transparent;
    border: 0.5px solid tomato;
    border-radius: 5px;
    padding: 5px 7px;
    box-shadow: 2px 2px 2px;
    transition: all 0.3s ease 0s;
  }

  button:hover {
    background-color: crimson;
    color: black;
    transform: translate(0, -5px);
  }
`;
- 코드리뷰 : 처음 시도 해보는 것이라 어려움이 많았다.
*Styled-component 활용해서 Modal기능을 구현했다. 제일 밖에 흑백을 만들고 거기에 자식으로 Modal창을 구현하고 inner에 어떤 형태의 모달을 구현할지 정해서 구현을 했다.
*어디서든 사용이 가능하록 기능을 구현을 했다. ClassName에 따라서 그냥 alert창만 닫고 끝낼건지, 아니면 다른페이지로 이동할건지 정해 두었다. 여기서 useHistory를 사용해서 page를 router를 사용했고, useLocation을 사용해서 페이지 주소가 변했을 때, 다른 페이지로 이동하거나 아니면 redirect가 되도록 history.go를 사용했다.
3. 회원관리/일기/태그 CRUD 기능 구현
- 코드 선정 : 2주 프로젝트를 하면서 Hook 기능을 많이 사용못해서 4주 프로젝트에서 Hook 기능을 사용, Facebook에서 밀고있는 기술(?) 트렌드(?)를 사용하고 싶었다.
- 코드 기능 :
1)useEffect
2)useState
3)useRef => 아이디 같이 중복확인을 무조건 한번 누르도록 구현을 했다. 항상 초기화를 시킬 수 있도록
(gif 클릭하면 자세히 볼 수 있음)

- 코드 예시 :
const WritingForm = ({ handleChange, handleTags, handleImg }) => {
  //업로드할 이미지 미리보기
  const [img, setImg] = useState(null);
  const [imgData, setImgData] = useState(null);
  const [tags, getTags] = useState("");
  const [arrayTags, getArrayTasgs] = useState([]);

  const HandleChangeImg = e => {
    if (e.target.files[0]) {
      setImg(e.target.files[0]);
      const reader = new FileReader();
      reader.addEventListener("load", () => {
        setImgData(reader.result);
      });
      reader.readAsDataURL(e.target.files[0]);
      handleImg(e.target.files[0]);
    }
  };

  const handleValue = event => {
    getTags(event.target.value);
  };

  const handleKey = event => {
    if (event.key === "Enter") {
      getArrayTasgs(() => {
        arrayTags.push(tags);
        return arrayTags;
      });
      getTags("");
    }
  };

  const handleTagList = index => {
    getArrayTasgs(arrayTags.filter((x, i) => index !== i));
  };

  useEffect(() => {
    handleTags(arrayTags);
  }, [arrayTags]);

  return (
    <Font>
      <Title>
        <span className="icon">
          <i className="fab fa-cuttlefish fa-2x" />
        </span>
        Today's Record
      </Title>

      <Container>
        <ContainerItem>
          <div className="content">일기제목</div>
          <input
            name="title"
            className="input-title"
            type="text"
            placeholder="  제목을 입력하세요"
            onChange={handleChange}
          />

          <div className="content">일기내용</div>
          <textarea
            name="text"
            className="input-content"
            placeholder=" 내용을 입력하세요"
            type="text"
            onChange={handleChange}
          />
          <span className="content">
            <div className="tagList">#태그목록</div>
            <div className="added-tag-list">
              {arrayTags.map((list, index) =>
                list === "" ? (
                  ""
                ) : (
                  <span className="show-tag" key={index}>
                    {`#${list} `}
                    <button
                      className="closeBtn"
                      onClick={() => {
                        handleTagList(index);
                      }}
                    >
                      <i className="fas fa-times"></i>
                    </button>
                  </span>
                )
              )}
            </div>
          </span>
          <span className="content">
            #태그추가
            <input
              className="input-tag"
              name="tags"
              type="text"
              value={tags}
              placeholder="  입력 후 'Enter'를 쳐주세요!"
              onChange={handleValue}
              onKeyDown={handleKey}
            />
          </span>
          <input
            type="file"
            onChange={HandleChangeImg}
            className="input-image"
          />
        </ContainerItem>
      </Container>
    </Font>
  );
};

export default WritingForm;
- 코드 리뷰 : 기능구현이 잘되서 좋았다.
* useEffect를 조금 더 활용해서 좋았다. useEffect는 lifecycle을 관여하는 메소드 이기때문에 언제 사용되는지 잘 파악을 해야했다. render가 된 이후는 어떻게 사용되는지? render가 되기전에 어떻게 해야되는지 배울 수 있었다. 특히, 2주 프로젝트에서는 Mount 기능만 주로 사용했는데, 이번에는 updateMount 기능과, clean up 까지 사용 할 수 있게 되었다.(아직 미숙하지만)
*아쉬운 점 : 일기를 수정할때, 이전에 작성했던 태그들을 불러와서 거기서 수정 기능을 전부 넣었으면 더 좋았을 것 같다.
4. 로그인 기능 유지
- 코드 선정 : sessionStorage를 사용했다. LocalStorage도 사용할 수 있었지만, 둘의 가장 큰 차이점은 유효기간이다. 그래서 사이트를 종료하면 Login 기능이 유지가 안되도록 하기위해서 session을 사용했다.
- 코드 기능 :
1)sessionStorage
2) useContext => isLogin에 값을 정해줘서 로그인을 했을 때만 볼 수 있는 기능들을 추가 할 수 있었다.
- 코드 예시 :
const LoginProvider = ({ children }) => {
  const [isLogin, setIsLogin] = useState(false);
  const [isChecking, setIsChecking] = useState(false);
  const [token, setToken] = useState("");
  const [nickName, setNickName] = useState("");
  const getToken = window.sessionStorage.getItem("token");

  const handleLogin = () => {
    setIsLogin(!isLogin);
  };

  const handleIsChecking = () => {
    setIsChecking(!isChecking);
  };

  const handleToken = value => {
    setToken(value);
    window.sessionStorage.setItem("token", value);
  };

  const handleSetNickName = value => {
    setNickName(value);
    window.sessionStorage.setItem("nickName", value);
  };

  useEffect(() => {
    let ac = new AbortController();
    if (getToken) {
      handleLogin();
    }
    return () => {
      ac.abort();
    };
  }, []);

  return (
    <getLogin.Provider
      value={{
        isLogin,
        handleLogin,
        token,
        handleToken,
        isChecking,
        handleIsChecking,
        nickName,
- 코드 리뷰 : 굳이 Redux를 사용해야 하나? 생각이 들었다. 그래서 google에 검색 했을 때, Redux 창시자의 인터뷰가 있었다. 라이브러리를 선택하는것은 개발자의 몫이라고 했다. 그리고 아무 이유 없이 라이브러리를 선택하면 안된다고 했다. 라이브러리가 많으면 번들과정에서 속도를 저하 시킨다고 했다. 만약 상태관리할 내용이 많다고 생각되면 Redux를 사용하면 된다고 했다. 이런 글을 보게 되었다. page별로 상태관리를 하기 때문에 Redux가 불필요하다고 판단했다.
*아쉬운점 : 이번에 Redux를 사용해볼까라는 생각을 많이 가졌다. router로 페이지를 구성하면서 page별로 상태관리를 하기 때문에 필요 없을 것이라 판단해서 Redux를 사용하지 않고 구현을 했다. 기능적으로 구현이 잘 되었지만, 또 다른 라이브러리를 활용할 기회를 놓친거 같아서 아쉽다.
5. CSS
- 코드 선정 : styled-component를 사용했다. 파일을 조금 줄여보고자 styled-component를 활용
- 코드 기능 :
1)Media query => 반응형으로 구현
2)display : flex
- 코드 예시 :
  @media only screen and (max-width: ${BREAK_POINT_MOBILE}px) {
    font-size: 25px;
    font-weight: 500;
    letter-spacing: 15px;
    margin: 2em;
  }
  @media only screen and (max-width: ${BREAK_POINT_TABLET}px) {
    font-size: 35px;
    font-weight: 530;
    letter-spacing: 15px;
    margin-left: 2%;
    margin-right: 2%;
  }
- 코드 리뷰 : CSS를 하면 할 수록 어려운것 같다. 정답이 없어서(?) 디자인 한다는게 이렇게 어려운지 몰랐다. 특히, 상속이 계속 이어져서 어느 부분에서 코드를 바꿔야 하는지 구분하기 어려웠다. => 공부가 부족했던 것 같다.
-- 전체리뷰 --
◎ 의사소통
2주 프로젝트에서는 의사소통이 잘 되지 않았다. 서로 한곳만 바라 보지 못하고(만들려고 했던 부분을 잘 이해를 못하고), 서로 각자 할 일만해서 리팩토링의 연속이였던거 같다. 하지만 4주 프로젝트는 서로의 의견을 이해시키기 위해서 노력을 했다. 하루에 3~4번 회의를 했을 만큼 서로를 이해시키고 만들려고 했던 부분을 이해하고 코딩을 하도록 노력했다. 그랬더니 리팩토링 할 시간이 줄어서 오히려 코딩을 하는데 가속도가 붙어 2주쯤 되었을 때, 대부분 기능들이 구현이 완료 되었다. 나머지 오류를 수정하고 Test하고 CSS 꾸미는데 2주를 다 사용했다.
★ 결론 : 의사소통의 중요성을 다시 한번 느끼게 되었다.
◎ React
2주 프로젝트에서 Hook기능을 많이 활용 못해서 아쉬었지만, 4주에서는 다양한 기능들을 사용 할 수 있어서 좋았다. Hook의 모든 기능을 다 사용한 것은 아니지만, 4주 프로젝트를 통해서 useEffect의 사용시기를 잘 조절해서 사용이 필요하다는 것을 알게되었다.
2주, 4주 프로젝트에서 React만 사용하다보니 다른 Redux나 mobx와 같은 상태관리 라이브러리 활용 기회를 놓친것 같아서 못내 아쉽다.
★ 결론 : Redux나 mobx같은 라이브러리 공부가 필요하다.
◎ CSS
CSS 상속의 개념이 어려웠다. 어디서부터 상속 되었는지 찾기 어려웠고, 어느 부분에서 풀어줘야하는지 어려움이 많았다.
이번 CSS로 layout을 잡을 때, flex 개념을 활용 했는데, 옵션들이 많아서 한 페이지를 구현하는데 어려움이 많았다.
★ 결론 : CSS 공부가 필요하다.
#codestates#4주프로젝트#후기#백서#Corona-Diary
'부트캠프 > Codestates' 카테고리의 다른 글
| CodeStates 수료 후 취업 1년 후기 (0) | 2021.12.25 |
|---|---|
| 4주 프로젝트 중간 후기 (0) | 2020.09.05 |
| 2주 프로젝트 백서 (0) | 2020.08.23 |
| Full time Immersive 11주 후기 (0) | 2020.08.21 |
